I came across these ADORABLE napkins/dishtowels and I can't wait to make them. They look super easy to make so I thought I'd share my find! I'll put mine up once I make my own! =) Leave me a comment if you do the same =)
Materials
linen fabric or a linen blend (I used a cotton-linen blend);
the amount you need depends on how many napkins you want to make
- ruler
- pencil
- iron
- sewing machine
- embroidery floss
- embroidery needle
Instructions
Planning and Cutting
For each napkin, cut a square of fabric that is 1″ longer on each side than your desired finished size. So, if you want to make a 10″ napkin, cut your squares 12″ x 12″. This is a nice size for a cocktail napkin; for a dinner napkin, a good finished size is a 20″ square.
Be sure to cut each square as precisely as possible, as this will help you get nice mitered corners. A cutting mat, straight edge and rotary cutter are really helpful in this case, but you can get the job done with scissors; just measure carefully and make sure your corners are square.
1. Iron the hems:
 |
| Turn one edge of the fabric to the wrong side a scant 1/2″ and press. Note: it really pays to make sure the edges in this step are measured and folded accurately, so if it helps, measure with a ruler and lightly mark the fabric with a pencil so that your fold is even all around. (This will ensure nice and even mitered corners.) |
 |
| Rotate the square 90 degrees and iron the next edge in the same way. Continue until all four sides have been turned up and pressed a scant 1/2″. |
 |
| Next, turn the hem up another 1/2″ on one side and press, then continue working all the way around until all four sides have been turned up twice. |
2. Make the mitered corners:
 |
| Unfold the folds you just made. Here, I’ve drawn over the fold lines to make them easier to see, but you can just use the folds themselves as a guide (no need to write all over your napkins!).Draw an (imaginary) line diagonally across the corner, connecting the folded points as shown with the dotted line. |
 |
| Trim the corner off at that line. |
 |
| Next, fold each side in 1/2″ along the previous fold lines. |
 |
| Then fold the corner flap down as shown. |
 |
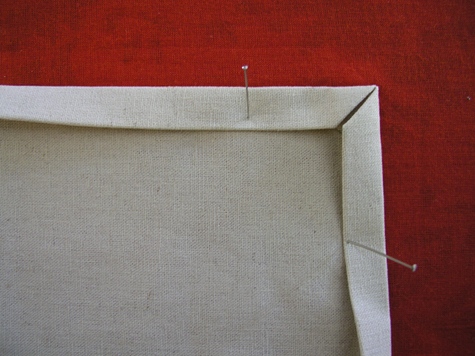
| Finally, fold each side in again along the previous fold lines. And voila! The corners are neatly mitered, with all the raw edges of the fabric hidden inside. |
3. Sew the hem:
 |
| Using your sewing machine, zip around all four sides of the hem, sewing close to the folded edge. At each corner, pivot and keep sewing; you can sew the entire hem in one continuous seam. (If you don’t have a sewing machine, you can easily do this by hand.) |
 |
| And the hem is complete! |
4. Add the embroidery:
 |
| To make the straight-stitch embroidery, simply weave the needle in and out of the fabric, going around all four sides of the napkin. Very easy! |
 |
To make the cross-stitch embroidery, first make a series of slanted lines all going in the same direction.
|
 |
| Then work your way back, completing each X. |
 |
| With embroidery, it’s good practice to make as few knots as possible, so when you begin a line of stitching, leave the embroidery-floss end hanging on the back side. Then, when you reach the beginning point again, tie the two ends together in one small knot and trim the ends. |
 |
| And that’s all there is to it! As I’m sure you can imagine, you can easily get creative and add any type of embroidery you like — a monogram would look especially fantastic on these! |